
No products in the cart.
tips
How to Install Only Specific Apps in Office 2021/2019 or Office 365
When you install Microsoft Office 2021, 2019, 2016. or Microsoft 365 Apps for Business (ex-Office 365), you cannot choose to install individual Office apps, change a path to the installation directory, choose a language, or change any other settings. The full Office package is always installed (all apps from the Microsoft Office suite are installed at once). You cannot choose to install only certain apps or change any settings from the Office installer interface. Once installed, you can’t use the Change button in Programs and Features to uninstall Office programs that you don’t need.
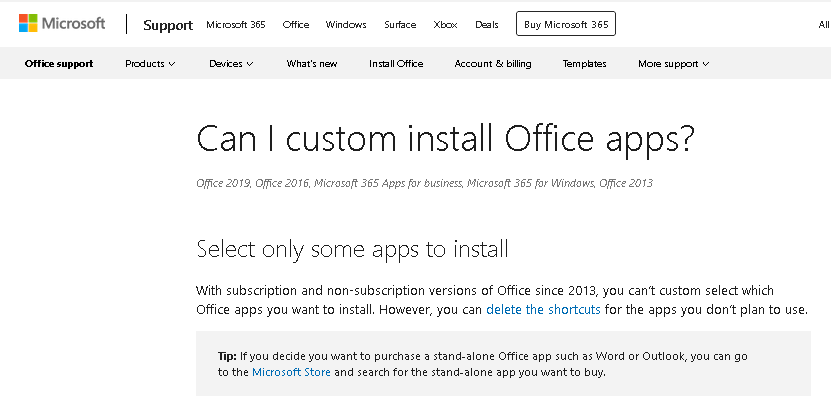
Office help on the Microsoft website states that you cannot selectively install individual apps in Office 2021/2019/2016/Microsoft 365 for Windows/Microsoft 365 Apps for business (link), and that it is recommended that you install individual Office apps from the Microsoft Store rather than using desktop apps. But it is not true.
Can I custom install Office apps?With subscription and non-subscription versions of Office since 2013, you can’t custom select which Office apps you want to install. However, you can delete the shortcuts for the apps you don’t plan to use.
Configure Office Installation Options with ODT (Office Deployment Tool)
You can use the Microsoft Office Deployment Tool (ODT) to selectively install only certain Office apps (for example, only Word, Excel, or Outlook). Download and extract the Office Deployment Tool (https://www.microsoft.com/en-us/download/details.aspx?id=49117) to a local directory (for example, C:\ODT).
ODT allows you to install Microsoft Office programs on your computer according to the settings in the XML file that you have configured (typically used to deploy Office in a corporate environment). In the XML file, you can specify which Office 2021, Office 2019, or Office 365 applications you want to install or uninstall, add the localization language, and set various app settings.
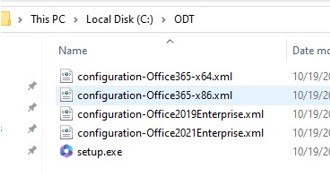
The ODT folder already contains several examples of such XML files for Office 2021 (configuration-Office2021Enterprise.xml), Office 2019 (configuration-Office2019Enterprise.xml), and Office 365 (configuration-Office365-x86.xml, configuration-Office365-x64.xml). You can edit these files manually, but it is much more convenient to generate the required XML file with the custom Office installation settings on https://config.office.com/ (Office Customization Tool).
Suppose, I only want to install Word, Excel. and Outlook from the Office 2019 package.
- Click Create a new configuration;
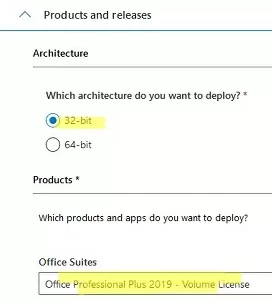
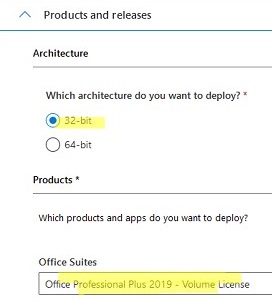
- Select your architecture (32-bit) and product (Office Professional Pro Plus – Volume License);
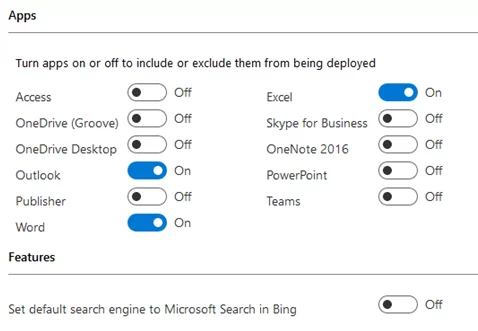
- From the list of programs, select only the ones you want to install. I have only selected Outlook, Word, and Excel;
Note that Groove is OneDrive for Business, and Skype for Business is Lync.
- Next, select the Office languages you want to install, the source of the installation files (this could be the Office CDN or a shared folder on your file server.), whether to remove previous MSI versions of Microsoft Office;
Modern versions of Office 365, Office 2019, and Office 2021 are installed using the Click-to-Run (C2R) Installer, rather than using an MSI package like previous versions of Office. Click to Run is a delivery method for Microsoft products where all files are downloaded to your computer from the Internet (Microsoft CDN).
- In the Licensing and Activation section, you can check to automatically accept the EULA, specify MAK or KMS license key to activate Office. If you install MS Office on an RDS server, you must use the Shared Computer Activation mode;
<Property Name="SharedComputerLicensing" Value="1" />
- You can configure additional options for Office programs in the Application Preferences section (we have skipped this step);
- Once all the settings have been defined, click Export. Specify the XML configuration and download it to your computer.
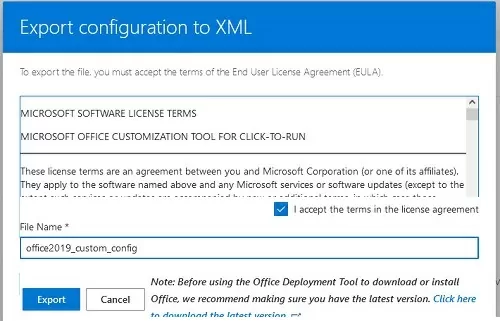

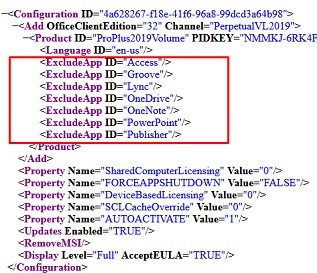
Move the XML file (office2019_custom_config.xml) to the ODT directory. The XML file contains the following lines, indicating that the ODT exclude the following apps then deploying Office on a computer.
<ExcludeApp ID="Access" />
<ExcludeApp ID="Groove" />
<ExcludeApp ID="OneDrive" />
<ExcludeApp ID="OneNote" />
<ExcludeApp ID="PowerPoint" />
<ExcludeApp ID="Publisher" />
<ExcludeApp ID="Lync" />
<ExcludeApp ID="Teams" />
<ExcludeApp ID="Bing" />
The Office Customization Tool website only allows you to create XML files for volume editions of Office. If you are using a Home, Business or other retail Office edition, you will need to enter the product ID manually. Popular Retail Office edition ProductIDs are listed in the table:
| Office Edition | ProductID |
| Micrtosoft 365 Business Retail | O365BusinessRetail |
| Micrtosoft 365 Home Pre Retail | O365HomePremRetail |
| Office 2019 Home Student Retail | HomeStudent2019Retail |
| Office 2019 Home Business Retail | HomeBusiness2019Retail |
| Office 2019 Personal | Personal2019Retail |
| Office 2019 Professional | Professional2019Retail |
| Office 2019 Standard Retail | Standard2019Retail |
| Office 2019 Pro Plus Retail | ProPlus2019Retail |
| Micrtosoft 365 Home Pre Retail | O365HomePremRetail |
| Micrtosoft 365 Pro Plus Retail | O365ProPlusRetail |
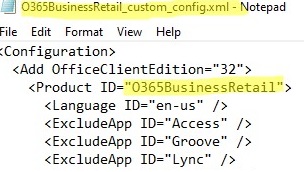
Edit the XML as follows. Replace the second and third lines with:
<Add OfficeClientEdition="32">
   <Product ID="O365BusinessRetail">
In this example, I want to install Office 365 Business Retail (replace O365BusinessRetail with the product ID that you want to use).
Custom Install Only Specific Apps in Office 2021/2019 or Office 365
Open the command prompt as administrator. If you selected to get the installation files from a CDN in the XML file, run the following command to download Office 2019 from the CDN (the files will be downloaded from the Internet) and install Office immediately based on the settings in your XML file:
cd c:\odt

Setup.exe /configure office2019_custom_config.xml
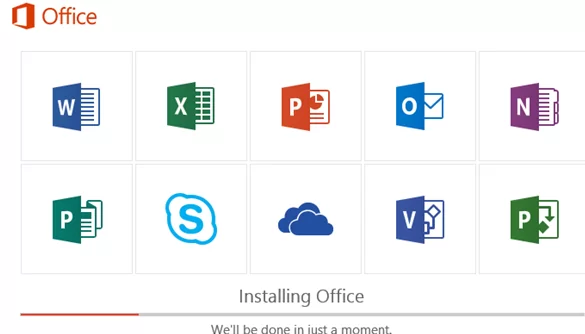
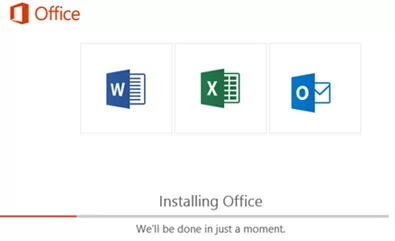
Office will be installed. the C2R installer window will display the icons of the installed Office apps that you have selected (in my example, only Word, Excel, and Outlook are installed).
As a result, only Word, Excel, and Outlook will be installed on your computer. If you want to install another app, for example, Teams, just remove the line <ExcludeApp ID="Teams”/> from your XML file. Save the file and apply the ODT using the same command:
Setup.exe /configure o365_custom_configuration.xml
If you want to install Office from a local drive or a shared network folder on your server, you must download the Office distribution installation files (about 3 GB) to your computer:
Setup.exe /download office2019_custom_config.xml
To install Office from a shared network folder (instead of downloading files from a CDN on the Internet), you must set the option in the XML. Replace:
<Add OfficeClientEdition="32" Channel="PerpetualVL2019">
with:
<Add OfficeClientEdition="32" Channel="Current" SourcePath="\\mun-fs01\install\office" AllowCdnFallback="FALSE">
In addition, you can enable the logging of the Office installation:
<Logging Level="Standard" Path="C:\ODT\"/>
Uninstall Individual Office App from Windows
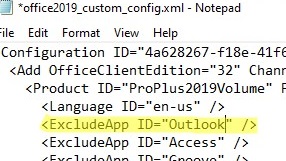
This XML file can be used to remove a specific app from an Office installation. For example, to uninstall Outlook, add this line to the XML file:
<ExcludeApp ID="Outlook" />
Save the file and run the command:
Setup.exe /configure office2019_custom_config.xml
The Office application that you have excluded will be removed from your computer.
woshub.com